gift displays have been always very well received by the recipient, so I had thought for Easter, a display in a half round shape - sometimes a slightly different Easter;). In the previews for the Easter motives I had already shown such a Easter display with Hasi Schlackohr .
 Chicky This time I have chosen as the subject and the times filled temporarily with plastic Easter eggs. As decoration were of course not absent in this display, the small patterned eggs and the round font label;) Click
The template for cutting by hand, copy, paste in a graphics or word processing program, print out the desired size and photo box and design transfer paper. On the dotted line is folded and it also marks the bottom part that is still cut out an extra portion.

To cut with the Cricut and SCAL click the template, save, add about Trace Image in the program and drag to desired size. Right click on 'Break Apart' select, so the shapes clicked individually and the part can be copied for sticking to a second page.

For me it has elongated oval of a size of 16.5 x 24.5 cm or 6 1 / 2 "x 9 3 / 4". When was cut with the Cricut again, create the extra base section fits on the large oval to follow suit with the bone folder to crease.
 for the cut edge with a 5 cm / 2 "narrow strip of photo board. The required length is determined the rounding of the bottom part only some coarsely measured with sufficient allowance. . Fold the strip along the 1.5 cm or 1 / 2 "and cut to the crease jagged Now the stripes are tentatively set at exactly the ground so that you can mark on both sides of the exact starting points can - there will be vertical fold lines drawn and cut the ends as adhesive tabs.
  for the cardboard strip is still a fitting, somewhat narrower strips cut from patterned paper and glued on. is not absolutely necessary, but I've cut the pattern paper to the back twice, so I can paste on both sides can.
 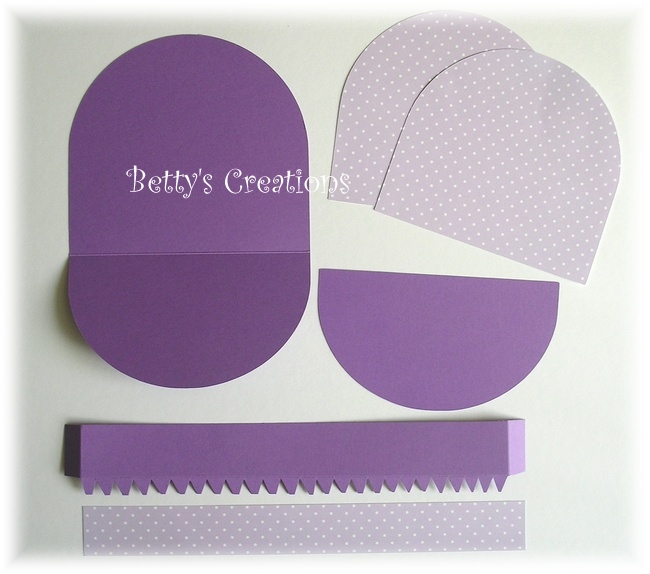 After the front of the rear part finished is designed, the strips are glued on. First, the flap is glued to the back, making sure that it is vertical. Now the spikes stuck in the ground and attached the other clip on the back.
  this process the display as a gift from all sides, clean looks, the prongs on the bottom are covered with the extra base and embellished the design with paper back - here you could also fit well as a label with a personal text.
  Now the strip is still decorated and finished then the nest is not filled already;)
  Stamp: Betty's Creations
 ink pad: Brilliance Graphite Black, Ancient Page Pink Pizzazz, Memento Dandelion
coloration: Copics
Punching: Spellbinders Nestabilities Ovals, Martha Stewart leaves
Design paper: I Karen Marie Klip
0 comments:
Post a Comment